Here’s a quick guide on using AutoSPSourceBuilder (https://autospsourcebuilder.codeplex.com/) to automate a SharePoint 2013 installation.
![]()
For those of you that aren’t familiar with it, AutoSPSourceBuilder will download all the necessary pre-requisites, SharePoint cumulative updates, SharePoint service packs and SharePoint language packs for you into a neat “slipstreamed” package that you can use with AutoSPInstaller (http://autospinstaller.codeplex.com/).
- Download the SharePoint Server 2013 ISO package from Microsoft.
- Mount the ISO to a drive letter. In my case, I’m using an Oracle Virtualbox virtual machine although you can use Virtual CloneDrive (http://www.slysoft.com/en/virtual-clonedrive.html).

- Download the AutoSPInstaller PowerShell script from http://autospinstaller.codeplex.com/ and extract the contents to C:tempSP. This will provide the folder structure for AutoSPSourceBuilder to download the files into – this will become your ‘slipstreamed’ installation package.
- Download the AutoSPSourceBuilder script from CodePlex http://autospsourcebuilder.codeplex.com/. Copy the contained scripts to C:\temp\SP\
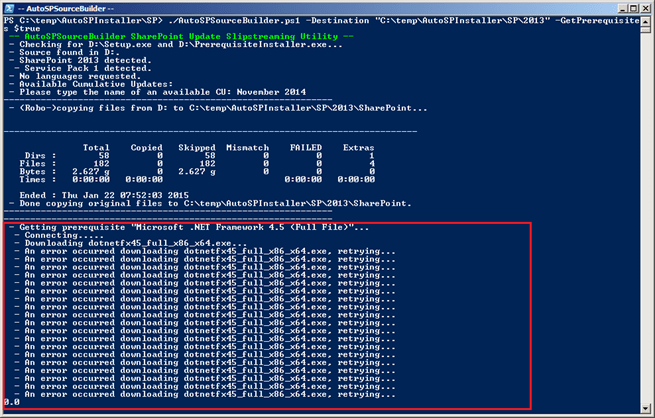
- If you are using a corporate proxy like I am, then you’ll need to modify the AutoSPSourceBuilder.ps1 script like so. Comment out the code at lines 150 and 152 in the DownloadPackage function. If you don’t, you may encounter the below error while running AutoSPSourceBuilder. In my case I also removed the ‘–ProxyList’ and ‘–ProxyUsage’ parameters because of a PowerShell version compatibility issue.


- Open PowerShell with elevated privileges (i.e. admin rights)
- Navigate to the script location ‘C:\temp\SP\’
- Execute the below PowerShell command. If using a proxy, you’ll be prompted for your network credentials, this is required to download the required files from the Internet.
./AutoSPSourceBuilder.ps1 -Destination "C:/temp/SP" -GetPrerequisites $true
- You’ll be prompted to enter the Cumulative Update to install. This corresponds to the list of updates AutoSPSourceBuilder.xml file. In my case I entered “November 2014”.
- At this point, the script will start download the pre-requisites, SharePoint cumulative updates, SharePoint service packs and SharePoint language packs for you.
- Once the script completes, your slipstreamed package (in C:\temp\SP\) is ready to be installed using AutoSPInstaller.


G’day, I’m a technical solutions consultant based in Perth, Australia that specialises in the Microsoft technology stack, including .NET, Dynamics 365, Azure and general web development etc.
This blog is my place to share my thoughts, helpful solutions and just random nerdy stuff.
This blog is my place to share my thoughts, helpful solutions and just random nerdy stuff.
Latest posts by Shane Bartholomeusz (see all)
- Solved: Filename too long for Git - 18th April 2025
- GitHub Actions Exam Study Guide - 14th February 2025
- Solved: Build Errors Not Showing in VS 2022 - 21st November 2024


15th December 2016 at 1:39 am
The current version of the AutoSPSourceBuilder already contains the list of updates/CU’s, etc… in the “AutoSPSourceBuilder.xml” file.
Then why would you have to type in the name of the Cumulative Update to install as you have mentioned in Step 9 ??? confused !!!
15th December 2016 at 8:38 pm
@Yu Although the xml file contains the list of CU’s that are available, you need to specify the CU that you want to install, as you may not necessarily want to install the latest and greatest e.g. when setting up a new like for like non-production environment.
Hope that makes sense.
14th January 2017 at 12:10 am
Okay – I get what you are saying.
It would be nice if you could add an parameter that allows you to select the VERSION and LANGUAGE …. that way the script will run unattended instead of waiting for user input..
BTW – awesome utility and thank you.
14th January 2017 at 12:22 am
Never mind … looks like the functionality to set the Language and version is already available:
https://blogs.technet.microsoft.com/heyscriptingguy/2014/02/01/weekend-scripter-using-autospinstaller-and-autospsourcebuilder/